Dynamic Backgrounds
On the back of the last post, I'm going with some slightly lighter reading. A lot of people have been asking about the background on this website, so this post will go into detail about how it came to be and some interesting things learned.
Initially I had wanted to keep the background of my site as clean as possible, with a simple repeating background image. So I headed over to the infinitely useful website subtlePatterns.com and started idly browsing through different patterns until I eventually came across a very nice pattern called footer lodyas that kind of reminded me of the robotic-like stuff from that movie 'The Signal'.
I lightened it all to whites and light greys and plopped it as the site's background, but it didn't really work very well and looked a bit shoddy - especially with text put out in front of it - so I eventually gave up and went back to a lightened paper background. However, during the course of the day the images of the pattern played on my mind and I began thinking about how cool it would be if I could generate that kind of background procedurally; a new image on each page. At some point memories of The Signal drifted in, and the way that the robotic props seemed almost organic in nature, shifting to fit their surroundings. By the end of the day I was sat in a pub desperately scrawling patterns on a piece of paper and rambling at my friends.
The Generator
What will follow will be a look into how the background generator works and some interesting lessons learned. Originally, I was going to show you guys the process I went through to get to the end product, but I think it flows better if I just jump right in and explain how it works - so here goes!
The entire thing is rendered onto a canvas element that's been placed statically behind everything and scaled to fit the entire page. This was quite easily achieved with this bit of CSS styling:
#backgroundCanvas {
    position: fixed;
    top: 0;
    left: 0;
    z-index: -1;
}
The actual pattern itself is formed by segmenting the canvas into squares and then filling those squares with 6 randomly-shaded triangles:
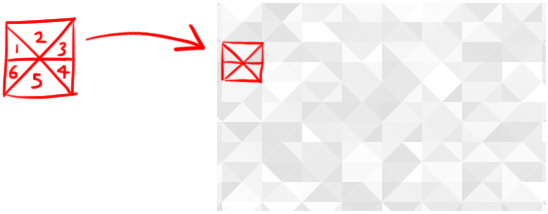
The JavaSript to produce this effect looks like this:
// Get a reference to the background canvas
var ctx = document.getElementById("backgroundCanvas").getContext("2d");
// Define the size of each triangle-box that makes up the grid
var sSize = 40;
var dividers = 6; // Divide the square into six
var turnAngle = Math.PI*2/dividers; // Calculate the division angle
let magnitude = Math.sqrt(sSize*sSize/2)*10;
// Expand the with of the canvas to cover the entire background
ctx.canvas.width  = window.innerWidth;
ctx.canvas.height = window.innerHeight;
// Use two loops to navigate across the canvas in a grid pattern
for(let i = 0; i<ctx.canvas.width/sSize; i++)
{
    for(let o = 0; o<ctx.canvas.height/sSize; o++)
    {
        // For each location, draw `dividers` number of triangles
        for(let p = 0; p<dividers; p++)
        {
            // Select a random shade to fill this square with
            shade = Math.floor(Math.random()*40 + 216);
            //shade = Math.floor(Math.random()*40);
            ctx.fillStyle = 'rgb('+shade+','+shade+','+shade+')';
            // First, begin the path in the center of the square
            ctx.beginPath();
            ctx.moveTo(sSize*(i+0.5), sSize*(o+0.5));
            // Calculate the first angle of the triangle (the first clockwise edge)
            let angle = p * turnAngle;
            // Draw it from the center using sin and cos to get the y and x offsets
            // (note that I limit the distance of the line)
            ctx.lineTo(sSize*(i+0.5)+limitToSSize(Math.cos(angle)*magnitude),
                   sSize*(o+0.5)+limitToSSize(Math.sin(angle)*magnitude));
            // Move the angle round to the next clockwise edge, and repeat
            angle = (p+1) * turnAngle;
            ctx.lineTo(sSize*(i+0.5)+limitToSSize(Math.cos(angle)*magnitude),
                   sSize*(o+0.5)+limitToSSize(Math.sin(angle)*magnitude));
            ctx.fill();
        }
    }
}
// This limiting function ensures that a square is drawn rather than a circle,
// keeping the drawn shape inside it's grid
function limitToSSize(num)
{
    return (Math.min(sSize/2,Math.max(num,-sSize/2)));
}
This page contains a running version of the script, with all JavaScript viewable in-source.
With the background generating some nice patterns the next step is to make the patterns generate around the contents of the site. The below function, when given a position in x/y coordinates and an array of element information data returns a normalised distance measure from the closest element. Normalisation is performed by running the computed distance measure through a sigmoid function, with a bit of number-fudging to make sure the number is between 0 and 1 and suits the needs of the program.
function getSpawnProbabilityAt(x, y, elementInfos)
{
    // Note all straight distance calculations are left as squared, to speed up the code.
    // First start with an arbitarily large number for the closest distance
    var finalDistance = Number.POSITIVE_INFINITY;
    // Then iterate over every element in the array
    for(let i = 0; i<elementInfos.length; i++)
    {
        let distance;
        // First check that the point is not inside the element, return 0 if it is, as nothing will be closer.
        if(x >= elementInfos[i].leftSide &&  x <= elementInfos[i].rightSide && y >= elementInfos[i].topSide && y<= elementInfos[i].bottomSide) {
            return 0;
        // Next, handle the case of the point being on the left of the element
        }else if(x < elementInfos[i].leftSide){
            // If it's above and to the left of the element, calculate the (squared) hypotenuse:
            if(y < elementInfos[i].topSide){
                distance = square(elementInfos[i].leftSide-x)+square(elementInfos[i].topSide-y);
            // Do the same if it's in the bottom left corner section:
            }else if(y > elementInfos[i].bottomSide){
                distance = square(elementInfos[i].leftSide-x)+square(y-elementInfos[i].bottomSide);
            // Finally, if it is within the element's y-space, simply return the x distance
            // Note here that this is the only time where the removal of the square root in the hypotenuse
            // calculation becomes more work, however this is the rarest case. (Question for the readers: Why?)
            }else{
                distance = square(elementInfos[i].leftSide-x);
            }
        // The rest of the if-else ladder handles the other 3 edges
        }else if(x > elementInfos[i].rightSide){
            if(y < elementInfos[i].topSide){
                distance = square(x-elementInfos[i].rightSide)+square(elementInfos[i].topSide-y);
            }else if(y > elementInfos[i].bottomSide){
                distance = square(x-elementInfos[i].rightSide)+square(y-elementInfos[i].bottomSide);
            }else{
                distance = square(x-elementInfos[i].rightSide);
            }
        }else if(y < elementInfos[i].topSide){
            distance = square(elementInfos[i].topSide-y);
        }else if(y > elementInfos[i].bottomSide){
            distance = square(y-elementInfos[i].bottomSide);
        }
        // Finally, if this particular element is closest to the point, mark this as the new closest distance
        if(distance < finalDistance) {
            finalDistance = distance;
        }
    }
    // Return the closest distance as a value between 0 and 1, rather than as a unit-distance measure
    return (1/(1+Math.exp(-(finalDistance*downScaler)+1.8))); //Fiddle with the numbers a bit to find a nice even scale
}
The elementInfos array was created by parsing an array of DOM elements through a function that extracted their absolute x and y positions, as well as the x-positions
of their left and right sides, and the y-positions of the top and bottom side, and put them into a return object. The function is expanded on in the last section of this
post, but it is based off the code found here. The square function is just a convenience
function that returns the square of a given number.
Using the getSpawnProbabilityAt function, it is possible to map - to any level of detail - how likely we want the background to be displayed in any given location.
Here (and above) you can see a demonstration of the spawn probabilities being generated for each position on a page in relation to blocker elements.
Bringing it all together, we can generate a random number for each triangle, compare it against its spawn probability and then generate it, randomly filling the page with respect to the content. This is the original background generation code but altered to use the spawn probability function:
...
// Estimate the center of this triangle by performing
// a half-rotation and multiplying by half the magnitude
let midAngle = (p+0.5) * turnAngle;
let midx = sSize*(i+0.5)+limitToSSize(Math.cos(midAngle)*magnitude*0.5);
let midy = sSize*(o+0.5)+limitToSSize(Math.sin(midAngle)*magnitude*0.5);
// Use the center location to generate a spawn probability for this triangle
let prob = getSpawnProbabilityAt(midx,midy,stagedElementInfos);
if(Math.random() < prob){
    // If a random number is less than the spawn probability, then generate the triangle here
}
...
This gives us what you can see here:

Now, if you've just been on that page and scrolled down, you will notice the folly in this implementation: The background does not
change to match the new positions of the elements! Of course, this can be fixed by simply re-calling
the generate function every time the page is scrolled, but that - as you can see here - has the unfortunate side effect of flickering on every move, as for every
scroll an entirely new set of random data is returned from the Math.random() call seen above (as well as the one used in shade generation). This, in turn, means that on every re-run of generate(), a
different set of triangles are rendered to the last call.
In order to fix this problem, some kind of pseudo-random number generator must be employed to generate suitably random numbers for each individual triangle, while allowing us to re-generate the same set of numbers if we re-generate the background (which happens every time page elements are moved relative to the page).
Now, as we want quite a bit of control over the numbers generated, I decided to go with a hashing algorithm. This is essentially a
function that takes a given number and aims to produce a one-to-one mapping with another, randomly located, number. For instance, if I had a function hash(x) for some x,
and ran hash(42), I would expect it to return some other random number, say, 31. I would also expect to have a low chance of ever seeing it return that
number again while passing other numbers that are not 42. However, running hash(42) again, I would expect to see - once again - that it returns 31. This
is useful because it means that as long as we can find a property that is unique and independent of external factors (such as screen re-sizing) for each triangle we are generating, then
we can also generate a pseudo-random number unique to the triangle, but that can be carried across multiple generations. Every triangle has a unique
position (and rotation within it's square), which we will use as the input to our hashing algorithm
A good hashing algorithm needs to be fast, and as close to a one-to-one mapping as possible (there are a few reasons for this, in our case it's good because if
the mapping were, say, many-to-one then lots of triangles would have the same random number assigned to them, so they'd all look the same!). As we're using the position,
which consists of at least two numbers (the x and y coordinates must both be used to gain uniqueness across triangles at least, and in the end I also ended up using each
triangle's rotation within it's square too) the algorithm has to accept multiple inputs and also needs to return a number scaled to between 0 and 1, so we know the
defined bounds of the returned value and can use it with respect to them (i.e. how we would regularly use the Math.random() method).
Hash algorithm development is quite a bit of work, and thankfully some nice people have public domain'd a number of good algorithms, and it is one of those (by Thomas Wang) that this program uses, ported from some old Java code that I'd written, which can be seen implemented in JavaScript here:
function getHash(key)
{
    key = ~key + (key << 21);
    key = key ^ (key >>> 24);
    key = (key + (key << 3)) + (key << 8);
    key = key ^ (key >>> 14);
    key = (key + (key << 2)) + (key << 4);
    key = key ^ (key >>> 28);
    key = key + (key << 31);
    return key;
}
To make proper use of this function I have wrapped it in the getPseudoRandom function that takes three input parameters and hashes them together by adding and re-hashing
the result for each parameter. I also hash in a global seed variable, which means I can obtain different random number sets per page by using a different seed (which, in
the final version, was the system time). Finally, I put the return number into a sine function and add 1 before dividing by 2, forcing the output to be a number between 0
and 1:
function getPseudoRandom(squareX, squareY, squareRotation, seed)
{
    let hash = getHash(squareX + getHash(squareY + getHash(squareRotation + getHash(seed))));
    return ((Math.sin(hash)+1)/2);// Make the final output between 0 & 1
}
This can then be used with the code I had written so far by simply replacing all references to Math.random() with references to getPseudoRandom() (note that to generate
a different random number for the shade, I added an arbitary number to the seed to generate a different number so the shade of a triangle would not seem related to it's appearance
probability):
...
let pseudoRandomNumber = getPseudoRandom(i,o,midAngle,seed);
if(pseudoRandomNumber < prob){
    //Use some other number for shade randomness:
    let psr2 = getPseudoRandom(i,o,midAngle,seed + 200);
    let shade = Math.floor(psr2*scale+bottom);
...
And that pretty much sums up what can be seen on this website right now! Go ahead and check out the source if you want to see the whole thing in action. To finish up, I'll go over some optimisations I tried out and some alterations I've made to the working copy (A list of the optimisations I tried can be seen at the top of the source).
Optimisation and Integration
One of the first things I worked on was implementing a fade feature so that the triangles would fade out of existence a random amount before not being rendered rather than just disappearing abruptly. Doing this basically revolved around setting the triangle's alpha value to a ratio of it's distance to content and it's spawn probability minus it's pseudo-random number. Involving it's pseudo-random number meant that each triangle disappears at a different rate, which I think looks a lot nicer than a shared disappearance rate (which kind of looks like I've just added a white box-shadow onto the content)
After this I moved on to optimisations. The original code was pretty sluggish, I really wanted to keep background generation to below 15ms and I believe at the time it was running
at about 110ms. The most effective optimisation was to group all content elements I wanted to generate around and compute their positions and spatial data once before each generation
of the page. This is why in the code above the getSpawnProbabilityAt() method takes the elementInfos array *an array of simple objects defining the bounds
of each element). Computing these in batches like this, as opposed to on-request from getSpawnProbabilityAt() really cuts down on the calls to getInfo which - being recursive - is a moderately
processor-heavy function.
Batch-processing the positions pulled the function runtime right down to about 10ms, which was fantastic but I quickly realised that my solution didn't scale very well. Adding a hundred
or so content elements to the page dragged it to a crawl, taking about 200ms for each function call! In order to get around this, I cull out all elements that aren't on-screen (seen in
the for-loop at the start of the generate() function). This does add on a few milliseconds to the function's runtime, but is well, well worth the addition, resulting in a method that
runs in about 14ms.
As can be seen in the list of optimisations, I tried out a few others that really didn't seem to work out too well. Removing the random evaluation call (and hence the distance measure)
from triangles outside of the main content was surprisingly not that effective. I also tried reducing the amount of hashing needed to be done, as the function uses it a lot (
twice per triangle on screen) so speeding it up would help. I attempted to use a partial hash for spawn probability, and then hashing the returned hash to generate the colour, which
would have cut out 4 getHash() calls per triangle and I also tried to remove the addition of the triangle's rotation from getPseudoRandom()'s hash chain. These both resulted in
bad random number separation; with many triangles next to each other having the same shade in the case of the latter, and the improvement gained was minimal so I decided against them.
Final Thoughts
This was a really fun piece of code to work on, and I had a great time fiddling with the various parameters involved. I would definitely recommend anyone with a curious mind to have a crack at some pattern generation once in a while! I may even write a follow-up post to showcase some of my unused dynamic backgrounds based on the same methods at some point in the future.
However, this post has been significantly trickier to write than I had initially intended. Admittedly, I did take the time between my last post and this to upgrade my blog system and perform some bug fixes on the site, so now I'm happy to say that it's parsing Markdown instead of the horrendous script-thing I had implemented beforehand. But I suspect the real crux of the issue has been the amount of time between actually writing the code and this post. As such, I'm thinking that I might go for a more episodic approach to my current projects, giving smaller updates on in-progress works, rather than large write-ups of old projects; or maybe I'll just write on more recent projects. What do you guys think? Feel free to leave a comment if you've any opinion on what you would prefer to see. Once again, thanks to Moritz for proofing this! Also thanks to Reuben and Tracey Talbot for picking up some other mistakes!
Until next time!